Child’s Pose, or Balasana, is a very popular kneeling yoga position. I’ve found this pose in almost every yoga class that I have taken. It is wonderful for focusing on stretching through your lumbar spine and pelvic floor.
Child’s Pose is a movement position that can be utilized on its own, or within a sequence of yoga poses. Child’s Pose is often used as a resting pose between other movements in a class, however, I like to encourage pelvic floor patients to focus on this position and the benefits that it can bring, you can work it in between your moves for its many benefits as well!
Yoga poses are not a one-size-fits-all, and everyone has a unique body and level of comfort. In this article, I walk you through the process of getting into the Child’s Pose yoga position, as well as the partner video through my YouTube channel, and offer variations for the position, including a seated variation for those of you stuck at work, to help you adjust this position to meet your needs. If you are looking for a different type of modification or have questions, feel free to contact me.
BENEFITS OF CHILD’S POSE
- Decrease pain in the pelvic region, abdomen, back, hips, and groin
- Help with conditions associated with pelvic floor dysfunction
- Combat chronic constipation, fatigue, and pain
- Combats fatigue
- Decrease period cramping
- Helps to facilitate introspection and focus on diaphragmatic breathing
- Aid with sleep preparation and downregulation
- Lengthens and stretches the tissues of the back and neck, aids with pain in these areas
- Gain opening in the ankles, knees, and hips
STEP-BY-STEP GUIDE TO CHILD’S POSE
TIP: Practice your diaphragmatic breathing with this posture 3x daily. Hold for 90 seconds at a time. This hold time is important for your body to transition and downregulate. It may feel uncomfortable at first. Meet your body where it’s at and breathe through it.
STEP 1 OF CHILD’S POSE

Begin on your hands and knees. Place your toes together behind you, in line with your tailbone.
STEP 2 OF CHILD’S POSE

Sit back and rest on your feet. Slide your knees wider apart. Slide to a comfortable level for you, that allows you to bend and drop your chest forward comfortably, while still supporting your abdomen. I change the width of my knees daily based on my body’s level of comfort that day. Feel free to do the same!
STEP 3 OF CHILD’S POSE

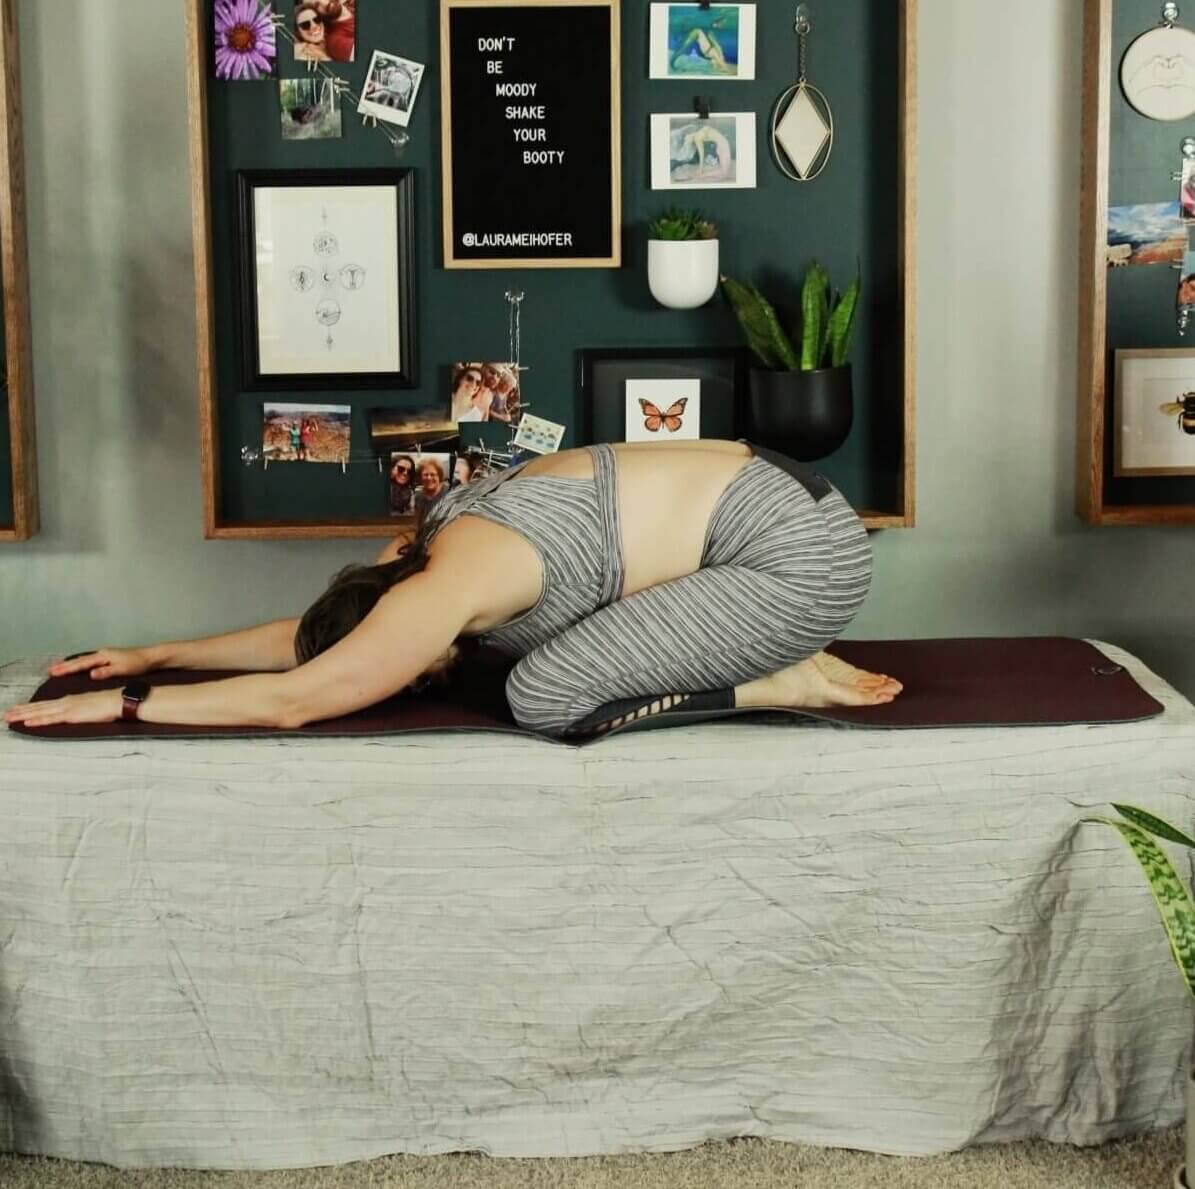
From here, slowly bend forward creating a nice curve through your tailbone and spine. I suggest moving into position slowly to monitor your body’s level of comfort. Here you can see I bend and place my elbows on the floor or surface.
STEP 4 OF CHILD’S POSE

Stretch your arms up to complete the pose. Or place your hands right above your head for a slightly gentler pose, which is my personal preference.

MODIFICATION #1 FOR CHILD’S POSE
This pose demands a lot of knee flexion or a bend in your knee. This can be painful or even impossible for some to achieve. To combat this concern utilize a towel, blanket, or foam roll behind your knees for additional cushion or support. This will also help to decrease the flexion demand on your knees.
NOTE! Even if you have one knee that can handle it, but one that can’t. Still utilize a towel and work to keep the position even through both knees in this scenario.
MODIFICATION #2 FOR CHILD’S POSE

Bolsters are a fairly inexpensive way to gain some support in Child’s Pose. When you utilize a bolster, you are effectively moving the floor or surface up to your chest, removing the need for you to drop your chest as low. This is a great modification for someone who is uncomfortable with the amount of pinching throughout your hips, or pressure on your lower back in this pose.
MODIFICATION #3 FOR CHILD’S POSE

Ankle concerns are another cause of discomfort in this position. If your ankle can not handle the amount of extension demand in this position, utilize that towel or mat you have in another way. Placing the support item underneath your ankles will allow you to keep your ankles bent. Raise them into whatever degree bend is comfortable for you. The additional modification below may help you as well to find a comfortable position with this variation.
MODIFICATION #4 FOR CHILD’S POSE

When placing your hands above your head, you may find that you have some discomfort with how low your chest drops. But maybe a bolster seems like too much lift for you? Simply place your hands underneath your forehead when reclining as in Step 4. You may also utilize your fist for added height if you desire.
MODIFICATION #5: SEATED CHILD’S POSE

If your knees and ankles can not handle any type of flexion at all, or if you are stuck in an office chair at work and still want to exercise and stretch that pelvic floor. This modification for Seated Child’s Pose will be ideal for you. Here is the best way to enter the seated position:
- Sit forward on your seat edge with enough room that your upper thigh is still supported.
- Position your knees directly above your ankles.
- Flex forward, bringing your rib cage to your thighs.
- Rest your elbows on your legs or knees.
- Rest your head in your palms.
Focus on the curve you are creating from the top of your head all the way down to your tailbone. Be careful not to slip into extension.
MODIFICATION #6: SEATED CHILD’S POSE

If you are looking to increase the reach of this position, but aren’t quite ready to move to Prone Child’s Pose from the beginning, this is a position that allows for you to fully fold forward.
Reaching your hands to the ground, place them on either side of your feet, or even grab either side of your ankles to hold the position. Let your head relax and dangle down, releasing tension in your neck and shoulders. Focus on your breathing and maintain the rounding throughout your spine in this position.
More Mobility Resources
For a full range of poses and stretches, with a multitude of modifications, check out the following resources:
- VIDEO PLAYLIST: Pelvic Floor Yoga Poses (with MODIFICATIONS)
- GUIDE: Pelvic Yoga (with MODIFICATIONS)
- VIDEO PLAYLIST: Pelvic Floor Stretches (with MODIFICATIONS)
- GUIDE: Pelvic Stretches (with MODIFICATIONS)
If you are struggling with pelvic floor health struggles and need an individualized, daily plan to build healthy movement into your life, book a FREE 20-minute consultation with me.
Or, if you’d like to learn more about all things pelvic floor health, head over to Instagram! You can always reach out in the DM’s if you have any questions!